
 Video
Video SMS Services
 Health


Guide to connecting to the network
Receiving and installing Internet and multimedia messaging on tablets and smart phones is based on the operating system of these devices and does not change based on brand and device type. Devices with similar operating systems and brands have the same setup. For information on the type and version of the operating system installed, you can refer to your device’s Settings / About Device section.
✔ Active data activation and data deactivation for tablets with different operating systems are similar to the above with the operating system.
Note: Due to the difference between Android operating system user interface (UI) on different phones, there is a possibility of minor changes to some phones settings as compared to displayed images.
1- First select “Settings”.

2- From “Settings” menu, select “SIM Cards & mobile networks” option.

3- Select RighTel SIM Card.

4- Select “Access Point Names” option.

5- You can add (New APN) via Add (+) option.


7- Select “Save” via three points at the top of page or in “More” section.

8. Select and enable “RighTel” from the list of visible APNs.

Note: Due to the difference between Android operating system user interface (UI) on different phones, there is a possibility of minor changes to some phones settings as compared to displayed images.
1- First select “Applications”, then select “Settings”.


2- In “Settings”menu, enable “Connections”.

3- Select “Mobile networks”.

4- Select “Access Point Names”.

5-You can add “New APN” via the Add (+) option.

6- In opened window, write RighTel in “Name” and “APN” section.

7- Select “Save” from three points of the top page.


Note:Due to the difference between the Android operating system User interface (UI) on different phones, there is a possibility of minor changes to the some phones settings as compared to the displayed images.
1- First select “Applications”, then select “Settings”.


2- In (Settings), select (Mobile network).

3- Select (Access Point Names).

4- You can add (New APN) via the Add (+) option.

5- In the opened window, write RighTel in “Name” and “APN” section.

6- Select (Save) from three points of the top page.


For information on how to activate the Internet, refer to Data activation guide page.
Note:Due to the difference between the Android operating system User interface (UI) on different phones, there is a possibility of minor changes to the some phones settings as compared to the displayed images.
1- First select “Application”, then select “Settings”.


2- In Settings menu, select Connections.

3- Select (Mobile Networks) from the sub-menus.

4- Select (Access Point Names).

5- You can add (New APN) via the Add option.

6. In the opened window, write down RighTel in “Name” and “APN” section and save the changes.

7- Select (Save) from three points of the top page.

For information on how to activate the Internet, refer to Data activation guide page.
Note:Due to the difference between the Android operating system User interface (UI) on different phones, there is a possibility of minor changes to the some phones settings as compared to the displayed images.
1- First select “Application”, then select “Settings”.

2- In “wireless & networks” select “more”.

3- Select “Mobile Networks”.

4- Select “Access Point Names”.

5- In APN + select “New APN”.

6- In the opened window, write down RighTel in “Name” and “APN” section and save the changes.

7- In Menu, select “Save”.

For information on how to activate the Internet, refer to Data activation guide page.
1- First select “Application”, then select “Settings”.
2- In “wireless & networks” select “more”.

3- Select “Mobile Networks”.

4- Select “Access Point Names”.

5- In APN + select “New APN”.

6- In the opened window, write down RighTel in “Name” and “APN” section and save the changes.

7- In Menu, select “Save”.

For information on how to activate the Internet, refer to Data activation guide page.
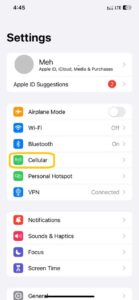
1- First select “Setting”.

2- Then select “Cellular”.

3- Select “Cellular Data Network”.

4- In the APN section, enter the RighTel as shown below.

For information on how to activate the Internet, refer to Data activation guide page.
Note:The Cellular Icon in versions 10 & 11 of this operating system has changed as follows.

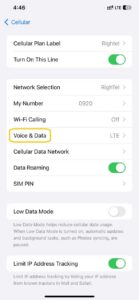
1- First select “Setting”, and then select “Cellular” option.

2- Select “Cellular Data Options”.

3- Select “Mobile Data Network”.

4- In APN write “RighTel”.

For information on how to activate the Internet, refer to Data activation guide page.
Phones running iOS version 9.1
1- Select “Setting” then select “Mobile Data”.

2- You can enable or disable the data on roaming mode using "Mobile Data" and "Data Roaming" mode.

Phones running iOS version 8.1
1- Select “Setting” and then select “Cellular”.

2- You can enable or disable the data on roaming mode using "Cellular Data" and "Data Roaming" mode.

1- Go to “Settings”, and then tap “Cellular”.
2- Select “Rightel’ in Cellular section.

3- Tap “Cellular Data Network”.
4- In the APN field, enter Rightel as shown in the image below.

For more information, refer to data activation and deactivation guide page.
1- Select “Setting”.

2- Select “SIM + Mobile”.

3- Select “SIM Setting”.

4- Enable “Manual Internet APN”.

5- In the opened window, write down RighTel in “APN” section.

6- At the end, “Save” the changes.

For information on how to activate the Internet, refer to Data activation guide page.
1- Select “Setting”.

2- Select “Mobile Network”.

3- Select “Add Internet APN”.

4- In the opened window, write down RighTel in “APN” section.

5- At the end, “Save” the changes.

For information on how to activate the Internet, refer to Data activation guide page.
1- Go to Start, select “Setting”.

2- From Setting, select “Connections”.

3- Select “Select Networks”. This option can be found in “Advanced” tab.

4- Select “New”.

5- In “enter a name for these settings” write down “RighTel”.

6- From the options below the page, select “Modem”, from the below of page select “New”.

7- In the determined place, write “RighTel” then in “Select a Modem” select “Cellular Line” then click “Next” to go to the next step.

8- In Access Point Name write down RighTel and you must exactly write it with capital letters as shown in the below picture.

9- Select next in below of page and go to next level.

For information on how to activate the Internet, refer to Data activation guide page.
1- First select “Application”, and then select “Setting”.

2- Then select “Network”.

3- Select “Connections”.

4- Select “New”.

5- In “Set Name” and “Name Access” write RighTel.

6- Make sure that in “Auth Type” the “None” option is selected.

7- Then save the changes.

For information on how to activate the Internet, refer to Data activation guide page.
1- From the shortcut bar, choose the “Settings” option.

2- Select “Network Connections”.

3- Select “Mobile Network”.

4- In “Mobile Network” please select “APN”.

5- In “Access Point Name” (APN), write RighTel.

6- Save the changes.

For information on how to activate the Internet, refer to Data activation guide page.